Baking bread from scratch may seem intimidating, but it’s far easier and more rewarding than it looks.
With just a few ingredients and a little patience, anyone can create a warm, fragrant loaf that fills the kitchen with a comforting aroma. You don’t need a bread machine or fancy tools. All you need is your hands, a bowl, and a willingness to trust the process.
Understanding the Basics
At its core, bread is a simple combination of flour, water, yeast, and salt. Each plays a crucial role:
- Flour provides structure through gluten development.
- Water hydrates the flour, activating the yeast and helping gluten form.
- Yeast is the leavening agent. It consumes sugars and produces carbon dioxide, which causes the dough to rise.
- Salt regulates yeast activity and enhances flavor.
When combined correctly, these humble ingredients create an airy, chewy texture and a golden crust that’s hard to resist.
For more confidence-building basics, see Knife Skills 101: How to Slice, Dice, and Mince Like a Chef.
Step-by-Step: Your First Loaf
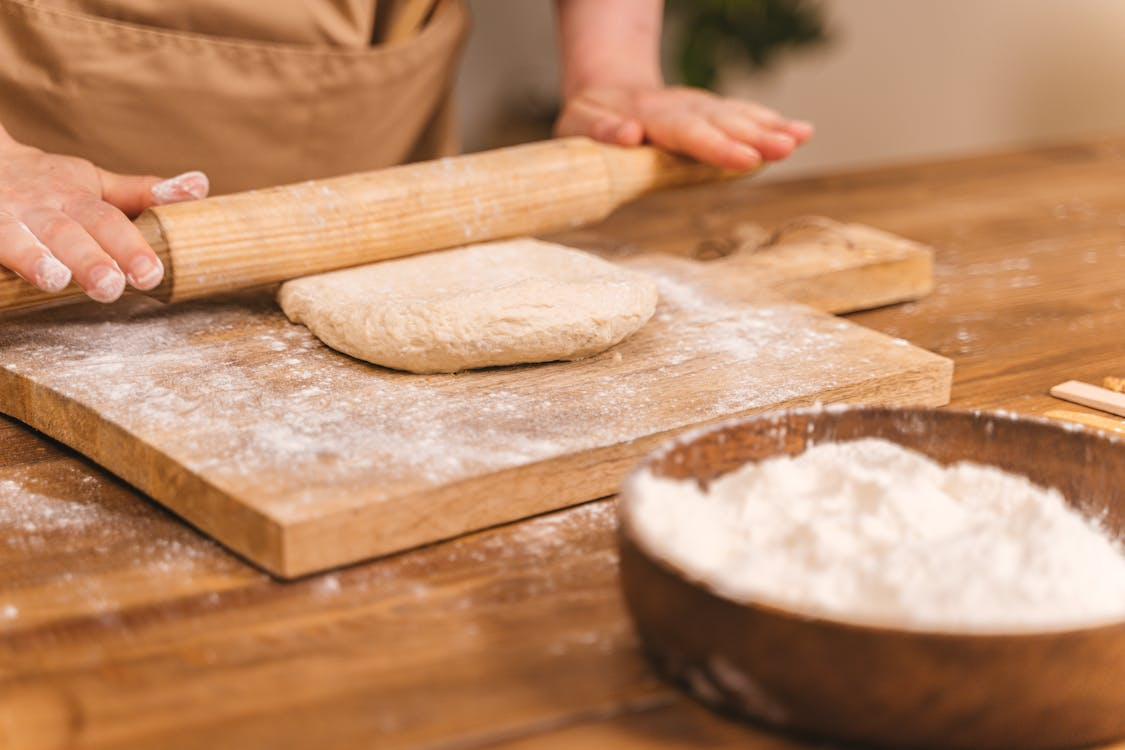
- Mix the Dough: Combine 3 cups of all-purpose or bread flour, one teaspoon of salt, one packet of yeast (about 2¼ teaspoons), and 1¼ cups of warm water (around 110°F/43°C). Stir until a shaggy dough forms.
- Knead by Hand: Transfer the dough to a lightly floured surface and knead for 8–10 minutes. Push it forward with the heel of your hand, fold it back, and repeat. You’ll know it’s ready when it becomes smooth and elastic.
- Let It Rise: Place the dough in a greased bowl, cover it with a towel or plastic wrap, and let it rise for about 1–2 hours in a warm place until doubled in size.
- Shape and Proof: Punch down the dough gently to release air, shape it into a round or loaf, and let it rise again for about 30–45 minutes.
- Bake: Preheat your oven to 425°F (218°C). Place the dough on a baking sheet or in a Dutch oven and bake for 25–30 minutes, or until golden brown and hollow-sounding when tapped.
That’s it—no machine required. Once you’ve mastered this process, you can start experimenting with different flours, seeds, and grains.
See Healthy Swaps for Everyday Ingredients (That Still Taste Great) for healthier ways to make your bread.
Tips for Success
- Use the right flour. Bread flour has a higher protein content than all-purpose flour, which gives your bread more structure and a chewy texture.
- Mind the water temperature. Too hot, and it kills the yeast; too cold, and the dough won’t rise properly. Aim for lukewarm.
- Don’t rush the rise. Fermentation builds both texture and flavor. Longer, slower rises (especially overnight in the fridge) produce a deeper taste.
- Add steam. For a crisp crust, place a pan of water in the oven while baking or spritz the inside with water before closing the door.
Everyday Bread Myths, Debunked
- “You have to knead perfectly.” Not true. Bread dough is forgiving. A few extra folds or minutes won’t ruin it.
- “Homemade bread stales too quickly.” Store it in a cloth or paper bag at room temperature, or freeze slices to reheat later. It’ll taste freshly baked.
- “Only professionals can bake artisan loaves.” Patience and good ingredients matter more than fancy equipment. Even beginners can achieve bakery-level results.
Read The Eco-Friendly Kitchen: Reducing Waste While You Cook for tips on minimizing kitchen waste.
The Joy of Homemade Bread
Baking bread is as much about mindfulness as it is about food. It’s the tactile pleasure of kneading, the anticipation of rising dough, and the satisfaction of that first warm slice spread with butter. Once you try it, you’ll realize homemade bread isn’t just tastier—it’s gratifying.